How I Created a Pastel Kitten Step by Step
- John Dawson
- 6 days ago
- 2 min read
There’s something special about bringing a drawing to life—especially when it’s a kitten. This piece was created step by step using soft pastels, building up from a simple outline to a fully detailed, lifelike portrait. Here’s a breakdown of the process behind my artwork


Stage 1: Mapping the Foundation (1)
Every strong artwork begins with structure. At this stage, the focus is on lightly sketching the kitten’s outline and placing key features—especially the eye and ear.
The eye is always my anchor point. Even early on, I begin adding detail here to establish life and direction. Around it, faint guidelines map the fur flow and proportions of the face.
Key focus:
Placement over perfection
Light pressure, minimal commitment
Establishing direction of fur
Stage 2: Building the First Details (1,2)
Once the structure is in place, I begin developing the eye, ear, and surrounding fur. This is where the drawing starts to feel alive.
The ear is particularly important—it introduces texture, colour variation, and softness. Layering begins here, using light and dark tones to suggest depth.
Key focus:
Short, directional strokes for fur
Building contrast gradually
Letting the paper tone work as mid-tones
Stage 3: Defining the Face (3, 4, 5)
With the eye and ear established, attention shifts to the muzzle and facial structure. The nose, whisker pads, and markings bring personality into the piece.
This stage is about connecting elements—making sure everything flows naturally and feels cohesive.
Key focus:
Subtle colour shifts (warm vs cool tones)
Soft blending vs sharp fur strands
Beginning to suggest volume
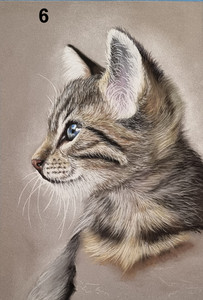
Stage 4: Expanding the Form (6)
Now the drawing starts to expand beyond the face. The neck and surrounding fur are built up using layers of fine strokes.
This is where patience matters most—realism comes from repetition and subtle variation.
Key focus:
Layering light over dark and dark over light
Following the natural direction of fur growth
Creating softness without losing structure
Stage 5: Bringing It All Together (7, 8)
In the final stage, everything is refined. Highlights are strengthened, whiskers are added, and edges are softened or sharpened where needed.
This is where the drawing truly comes to life—the moment when it stops looking like a drawing and starts feeling like a real animal.
Key focus:
Final highlights (especially in the eye and fur tips)
Clean, confident whiskers
Balancing sharp detail with soft transitions
Final Thoughts
Creating a realistic pet portrait isn’t about rushing to the finish—it’s about building layers, observing carefully, and letting the artwork evolve.
Each stage plays a role:
The sketch sets the foundation
Early details create life
Layering builds realism
Refinement brings it all together
If there’s one takeaway, it’s this: focus on one small area at a time, and let the drawing grow naturally.
If you’d like to see more behind-the-scenes progress like this—or commission your own pet portrait—stay connected. Every piece has a story, and this kitten was no exception.
Comments